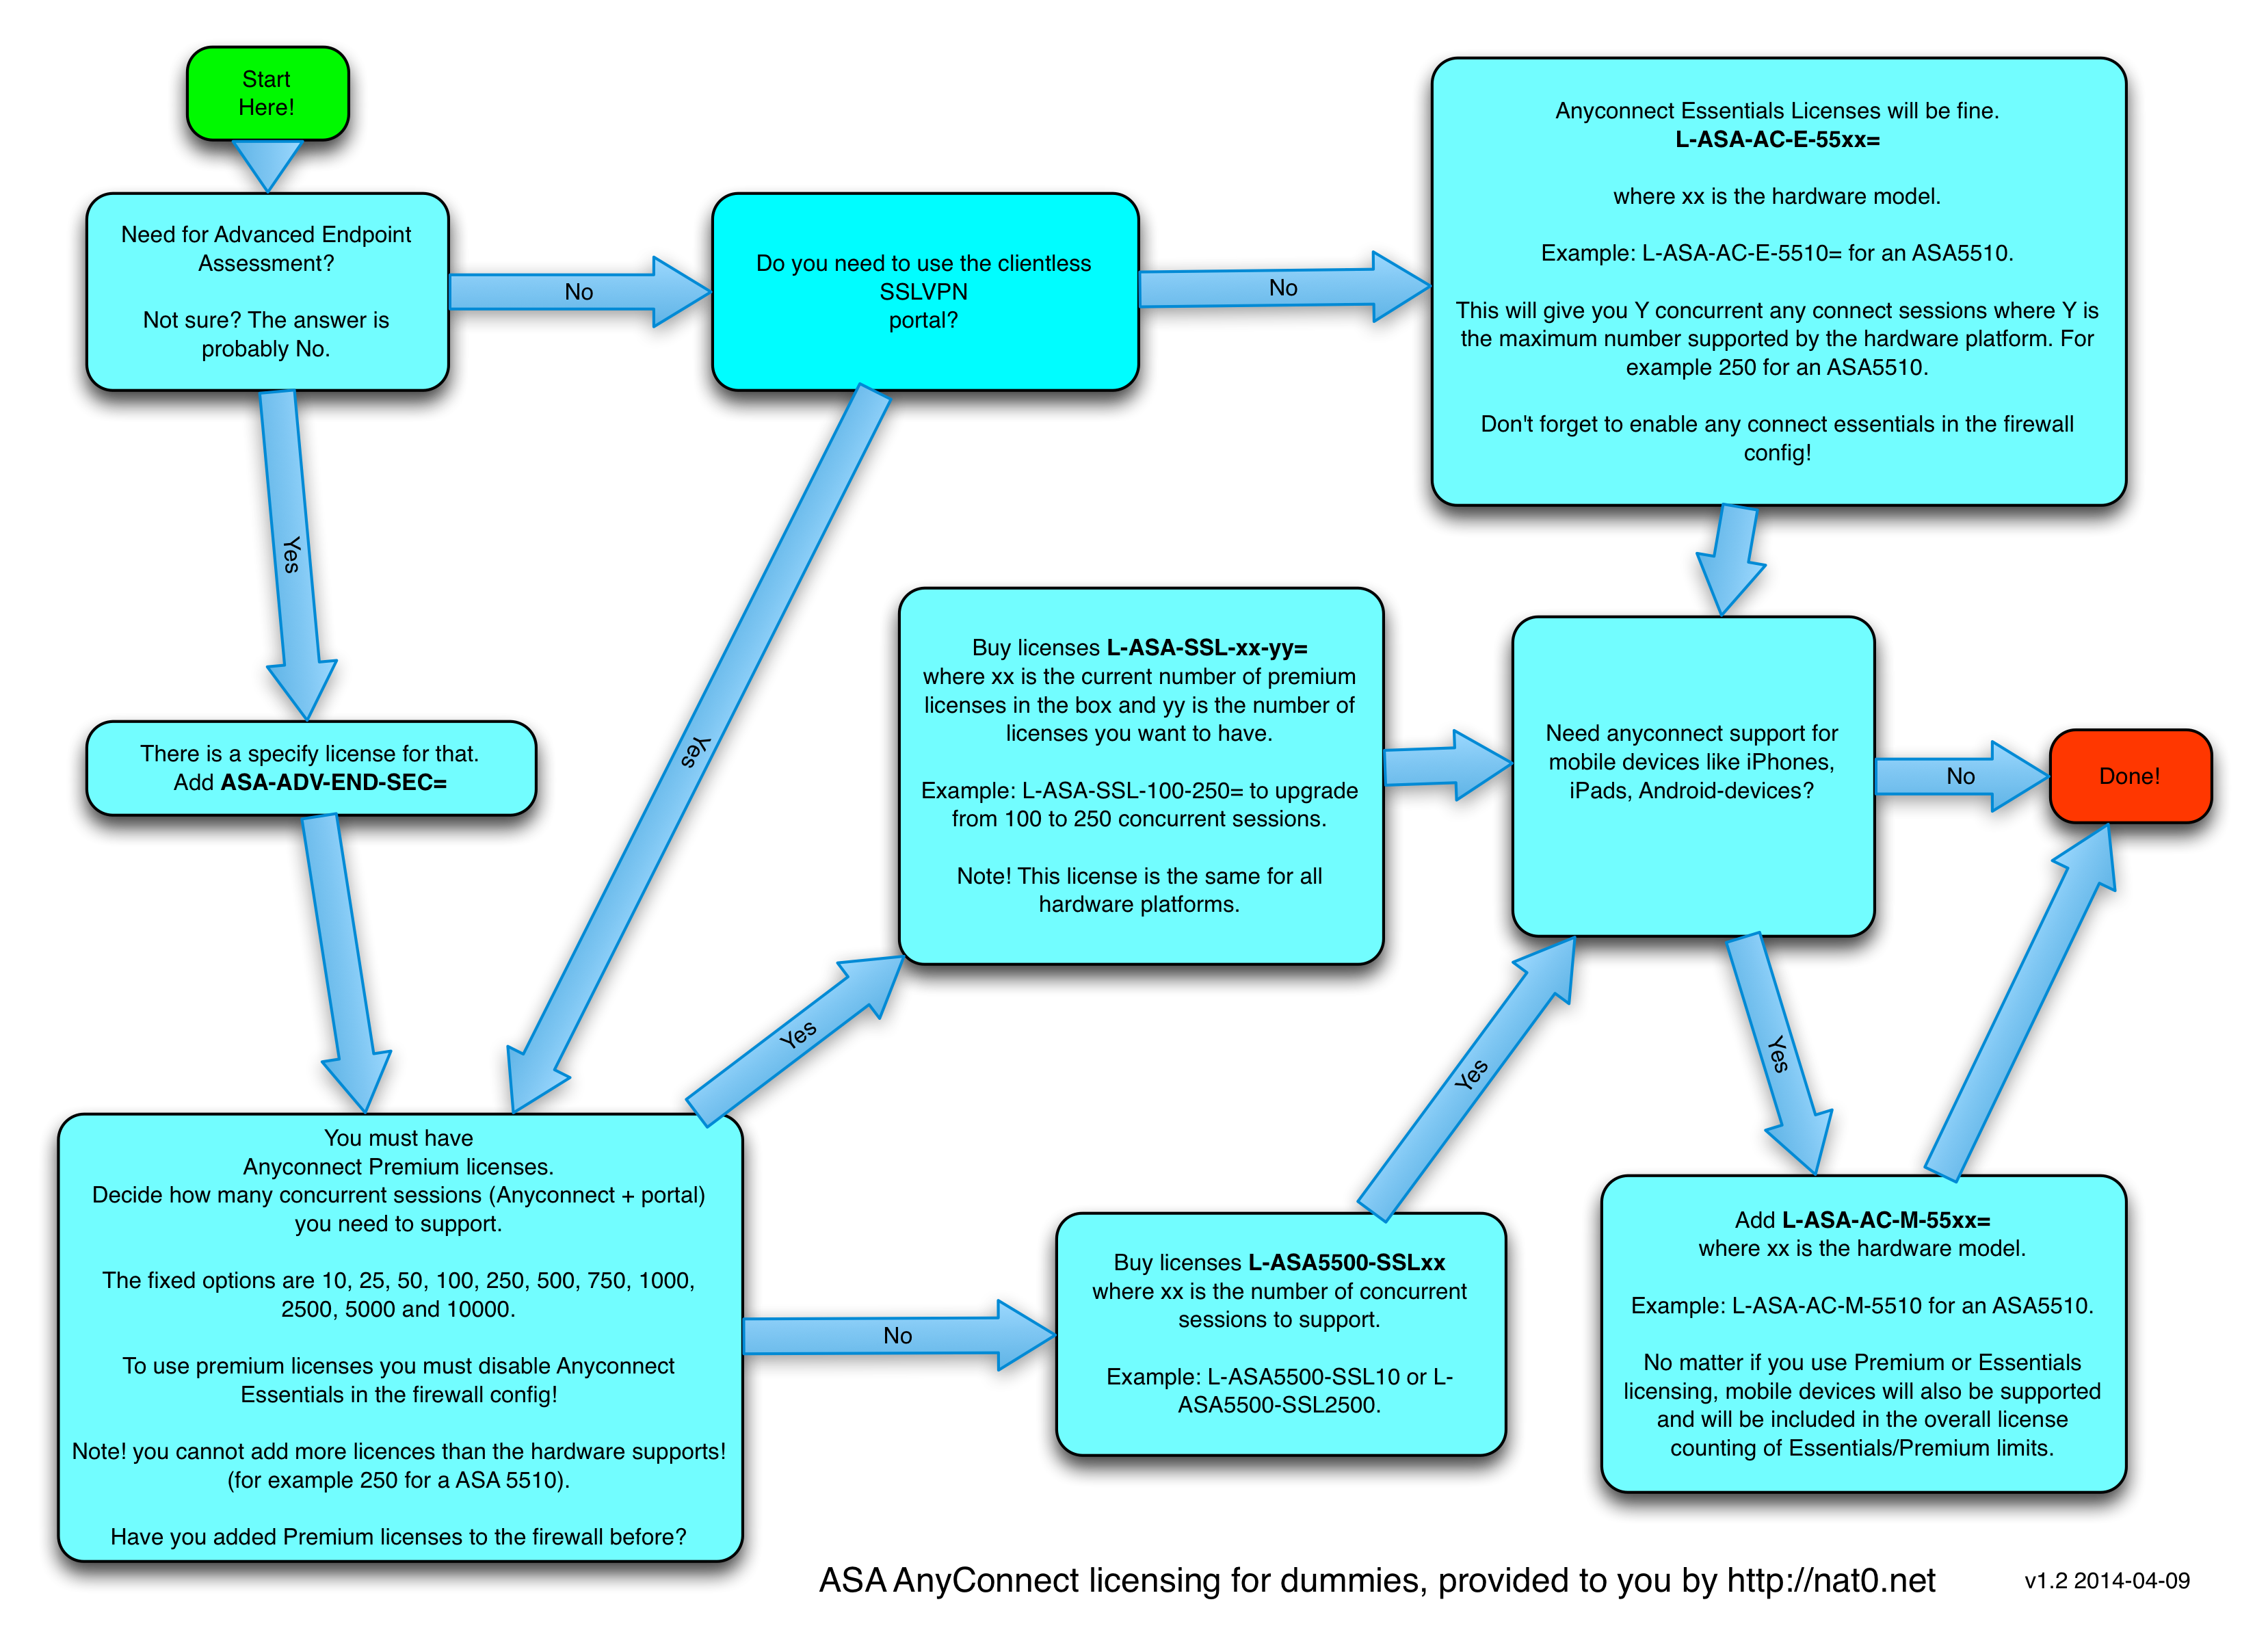
Ironport WSA https-certificate import

Memento: When exporting a root certificate (with its private key) from a Microsoft Root CA you get a pkcs#12-file (.pfx). In order to import this cert and key into the Cisco Ironport WSA as a root certificate you need to do this:


  1. Move the .pfx-file to a machine with openssl installed
  2. Run “openssl pkcs12 -in myinfile.pfx -out myoutfile.pem -nodes
  3. When prompted enter the password you used when exporting the cert/key on the CA server.
  4. Open the myoutfile.pem file in a texteditor.
  5. Copy the lines beginning with (and including!) the line “—–BEGIN CERTIFICATE—–” and until the end of the line “—–END CERTIFICATE—–“.
  6. Paste that content to a new file and save it to something like cert.pem
  7. Open the myoutfile.pem again in a text editor.
  8. Copy the lines beginning with line “—–BEGIN RSA PRIVATE KEY—–” and ending with the line “—–END RSA PRIVATE KEY—–“.
  9. Paste the content to a new file and save it to something like key.pem.
  10. Select the files as Certificate and Key respective in the WSA GUI under Security Services-HTTPS Proxy-Edit Settings…-Root Certificate for signing-Use Generated Certificate and Key.

I have googled this so many times now. Hopefully google will index this rapidly and next time I google it I will see my own blog post as the first search result. 🙂

Memento is… oh sorry, forgot what to write here…

Posted in Uncategorized

A new contributor to the blog! – Who am I?

Well, thats a question I ask myself sometimes without getting a really good answer! But as an introduction to this blog and you readers I´ll try to make an effort to explain in some nice words.

My name is Ola and am 38 years old, single and I live in a very small town somewhere between Stockholm and Gothenburg. I´ve been in the “industry” since 1999 when I took my first steps in IT at a large govermental institution in Sweden. I started up at the helpdesk and worked my way from there. Right now I work as a Senior Infrastucture Consultant @Crayon and my specialities are PKI, Smart Cards and Certificates. But I work with most of Microsofts Infrastructure products aswell as some vendors of software for client protection. And hopefully I can enlighten all you readers some in these areas.

When I´m not working I coach a soccer team in 2 division, try to visit the gym frequently and enjoy to travel. And between that I´m looking for someone to date.. 🙂

Well, thats a short presentation! Hope you enjoy my efforts to make this blog a little certificate friendly.. 🙂

Posted in Meta

hash-based password generator

After reading about sqrl, the qr-based login system invented by Steve Gibson, I started to think about hashed password generators as a light-variant to sqrl.

What if you could have a password generator that always gives you the same output? Think about it. You use the generator that outputs the password of “1LKk23j!2323^dfD” to be used at facebook.com. One year later you forgot that password and you start the same password generator and it gives you the same password again. Great, huh?

In order for it to be secure we have a few requirements though:

  1. It needs to be unique per site. That is, I do not want to use the same password on facebook, twitter, amazon and instagram.
  2. It needs to be unique per user. I do not want to have the same facebook password as you have.

So, we take 2 inputs to the password generator:

  1. Something that is unique per site. The domain name or the site name or whatever. For simplicity say that you enter “facebook” for facebook, “twitter” for twitter and so on.
  2. Something that is unique per user. My super secret key. It might be the chassis number of my ex spouse brother´s first car, the first sentence in your favourite book or anything hat you will always remember (and write down, and store it securely!).

We also have to decide the length of the output passwords. I suggest something like 12 characters. It is long enough to not brute force.

I built the password generator as a simple bash script since I have already openssl installed. The script below will do this:

  1. ask for the site-specific parameter you want to create the password for (in our example ‘facebook)
  2. Ask for your super secret private password.
  3. Create a cryptocraphic hash digest of your site-specific password ‘facebook’ with your private key as a… eeeh… private key. 🙂
  4. Since the output is binary, all non-printable characters will be removed.
  5. The first 12 bytes of the string will be printed on the screen.


#!/bin/bash
export IFS=""
export LC_ALL=C
read -rp "site: " PARAMETER
read -rsp "common private key: " PASSWORD
echo "Password for site $PARAMETER:"
echo "$PARAMETER" \
| openssl dgst -sha512 -binary -hmac "$PASSWORD" \
| tr -cd '[:print:]' \
| cut -c1-12
echo

IANAC (I am not a cryptographer). Not at all. Am I doing this wrong? Can I enhance the security even further? If you have any input in the subject, please write a comment below!

As I wrote above, I did come up with the idea when reading about sqrl. And after googling around the interwebz I quickly realised that all good ideas are already had. The script above is a rip-off of the hashapass cli-version with some improvements. Since I am not using base64 but instead binary output I will get a password with more variety in characters (higher entropy). Also I raised the password length from 8 to 12 characters.

Posted in Uncategorized

DNS Doctoring in Cisco ASA

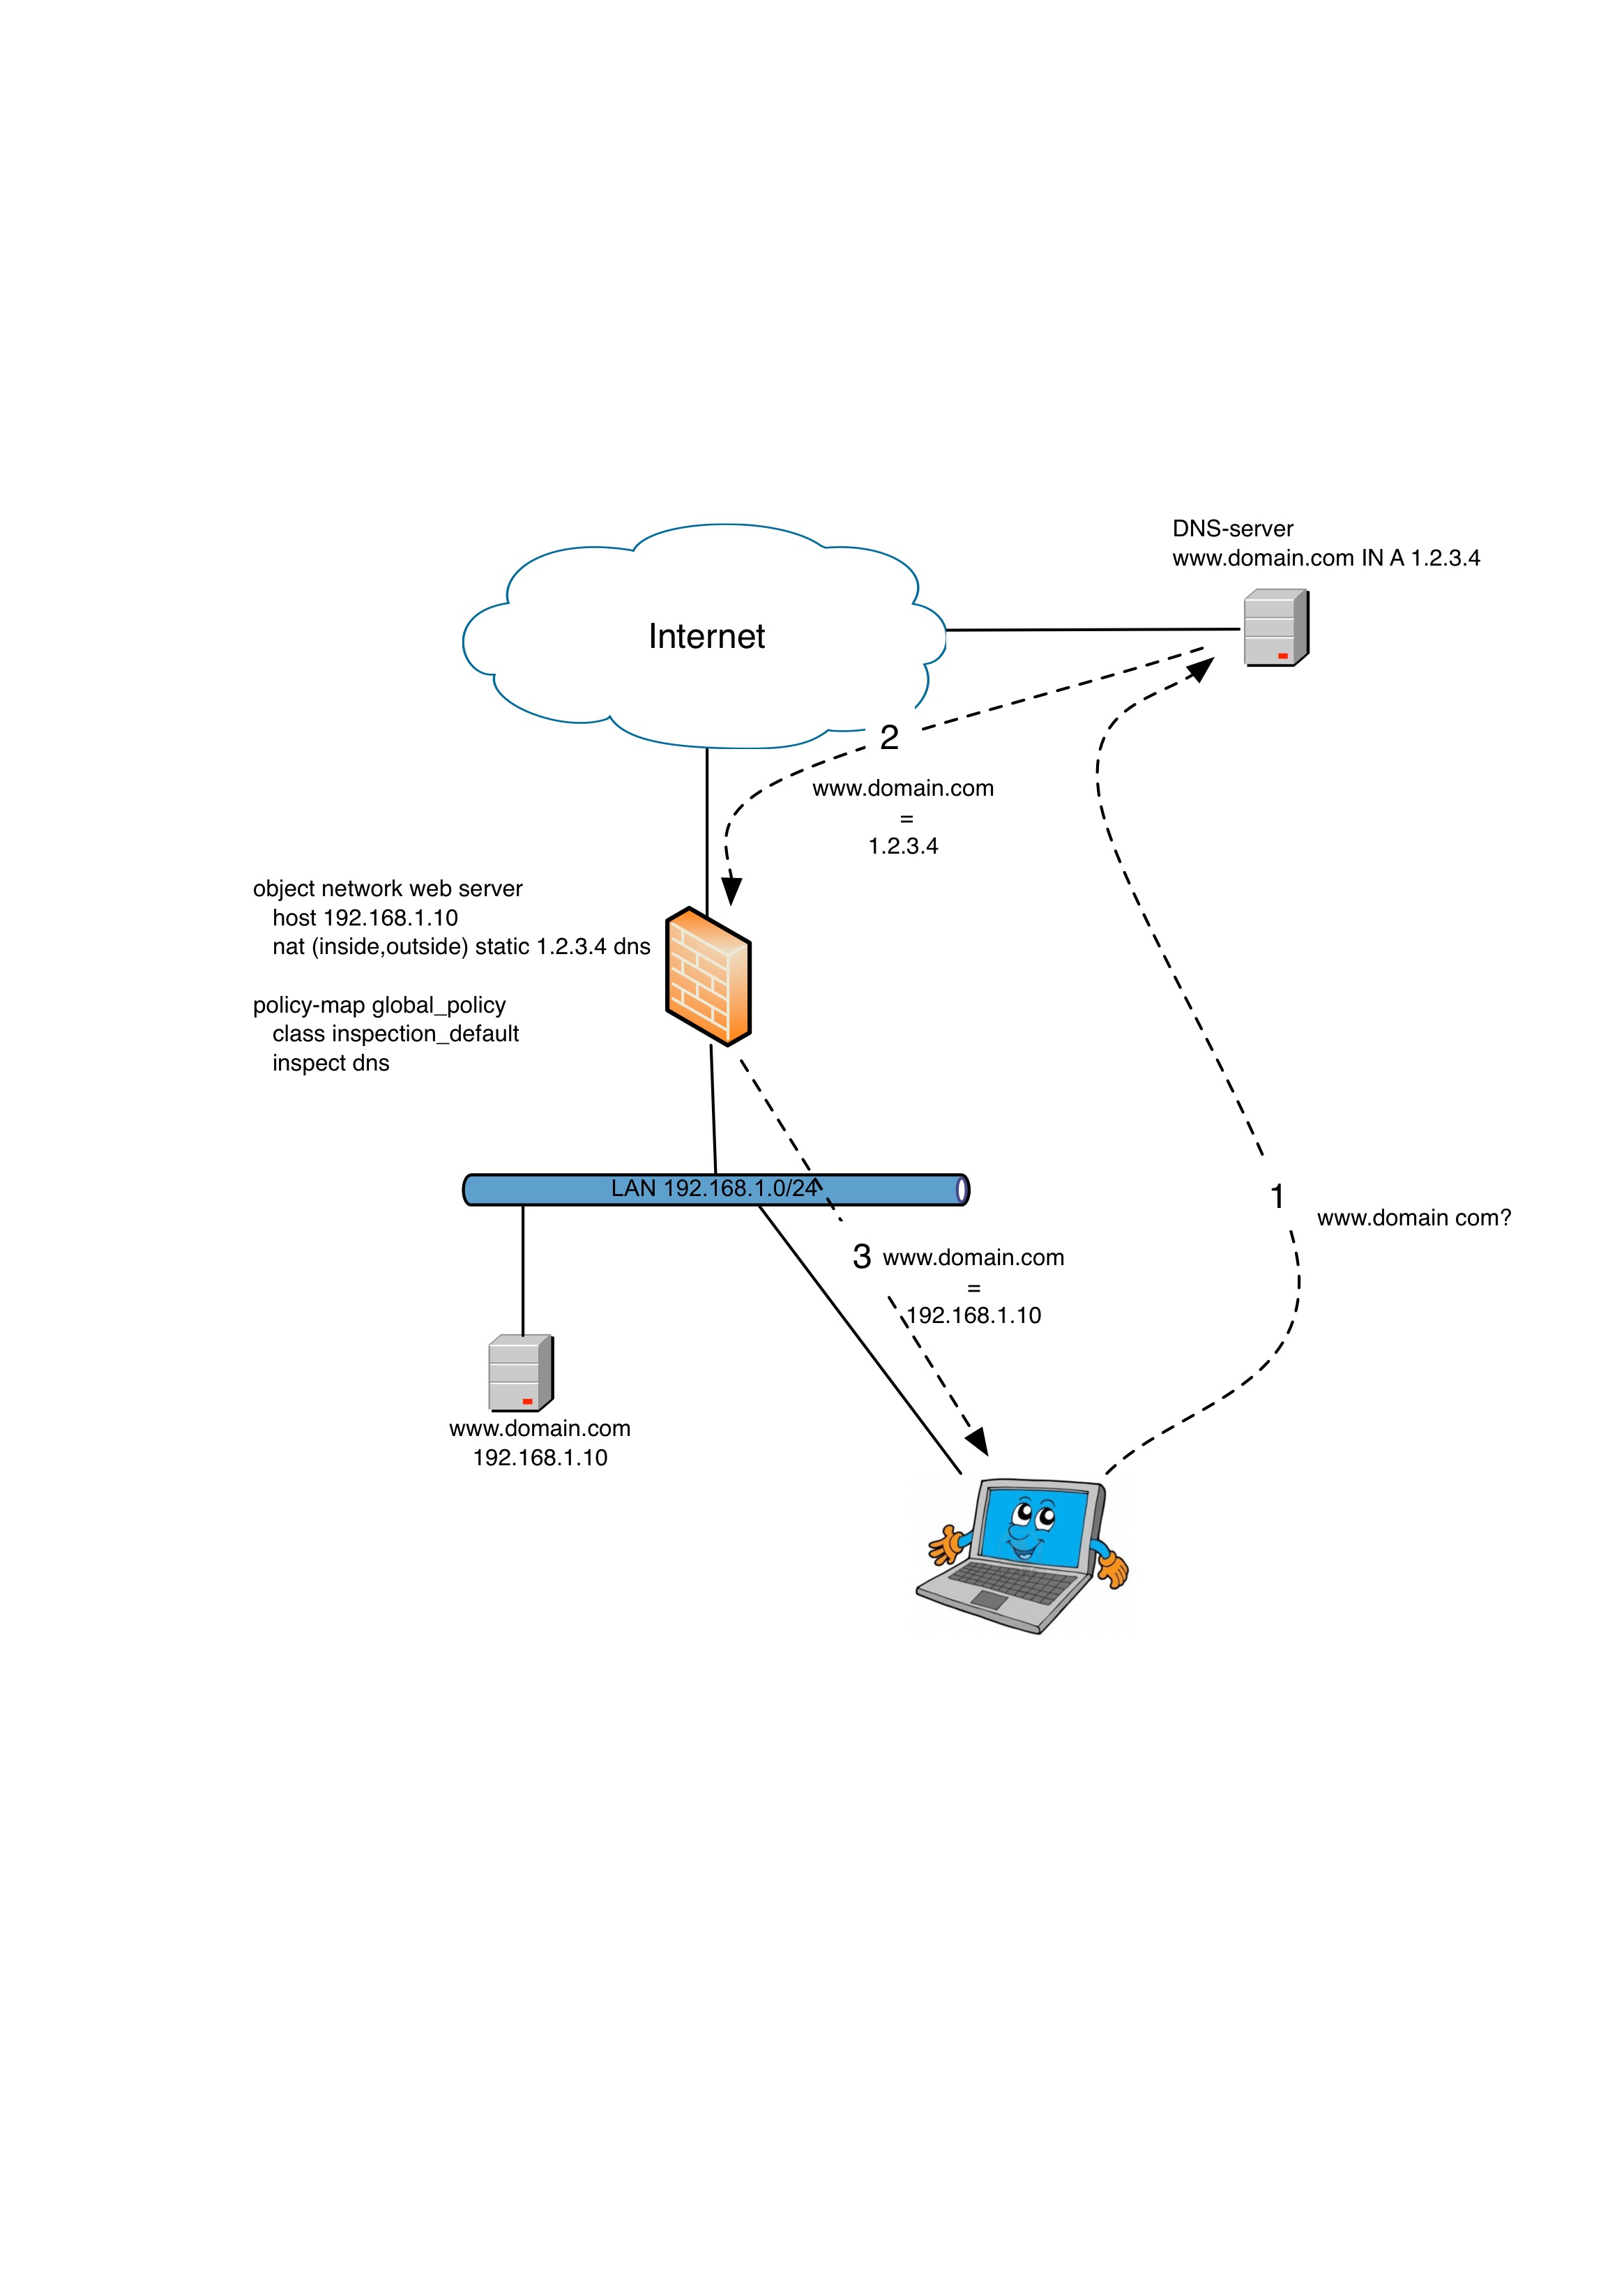
Issue: Your internal clients tries to reach an internal server but since they resolves the address of the server from an external DNS-server they will get a public IP.


Solution: DNS Doctoring.


In the example below your client is on the internal 192.168.1.0/24-network. When looking up the hostname for the webserver www.domain.com it resolves to the public ip of 1.2.3.4. When the client on the inside tries to reach the NAT:ed IP 1.2.3.4 the ASA will get confused and there will be no response.

There is a NAT already configured mapping the public ip 1.2.3.4 to the internal IP 192.168.1.10. The trick here is to add the keyword “dns” to the end of the static NAT-statement. This will inspect all DNS-traffic goingthru the ASA and when it seed a DNS-response of 1.2.3.4 sent to an internal host it will modify the packet so that the response will be 192.168.1.10 from the clients point of view.


The only thing to remember here is that you need to do DNS inspection in the firewall for this to work. Or else it will not. 🙂


So the configuration  will be:


object network web server
host 192.168.1.10
nat (inside,outside) static 1.2.3.4 dns
!
policy-map global_policy
class inspection_default
inspect dns

DNS-doctoring

If you are a GUI-type of human you set the DNS-setting by finding your specific NAT-statement (for the public webserver) under Configuration -> Firewall -> NAT-rules and in the window for your NAT hit the “Advance”-button. There you find the “Translate DNS replies for rule”.


The inspection is found under Configuration -> Service Policy rules -> Global Policy -> inspection_default (double click it) -> Rule Actions -> Protocol Inspection and make sure that the DNS checkbox is set.


And don´t you forget to write mem! 😉

Tagged with: , , , ,
Posted in Cisco Security

IPv6 address assignment will be messy

I am currently working with developing an introductionary workshop for IT consultant with the subject of IPv6.

Scope:
A client (windows 7) is connected to an internal network. On the same network there is a router facing internet, and a DHCPv6-enabled server.

Scenario 1
The DHCPv6-service is disabled. The router has RA (Router advertisements) enabled.
What happens?

  • The client gets a self-assigned globally routable IPv6-address based on the RA received.
  • The client will use the RA source address as default gateway.
  • The client will (obviously) not get any DNS-settings.

Scenario 2
The DHCPv6-service is enabled. However, there is no RA:s sent out from the router.
What happens?

  • The client will get an IP from the DHCP-pool
  • The client will NOT get a default gateway
  • The client will get DNS-settings from the DHCP-server.

Scenario 3:
Both RA:s and DHCPv6 is enabled on the network.
What happens?

  • The client will get an IP-address (self assigned based on RA, NOT from the DHCP-server!)
  • The client will use the RA source address as default gateway.
  • The client will request and receive DNS-settings from DHCP.

So, my conclusion is that both RA and DHCP is needed in order to receive all settings to the client. And if you do, the DHCP-scope in the server will not be used because the client will use RA addresses. Bye bye, static leases!

Oh. And the security approach on this: How much have we not liked the flaws with non-authenticated address assignments in Ipv4? How much will we in a near future not like the fact that we need two different protocols to get ip settings to our clients? And are DHCPv6 and RA even remotely slightly secure? Noooes.

Tagged with: , , ,
Posted in General Networking, General Security, Security

Signuppp

[mc4wp_form id="2457"]
Website Security Test